In the summer of 2012, I was approached by the company Europa Sound Post with the question if I would be able to take on the task of heading up the new venture into image postproduction they planned to setup within the existing infrastructure.
The company had two different facilities in Stockholm, one located in Filmhuset and one down by the docks in Frihamnen. The sound department was mainly located in the facility in Filmhuset and the setup there was:
1 x Cinema audio mixing theater; Dolby and THX classified, 9 meter screen, 20 seats and running a dual setup of both Nuendo and Protools.
2 x TV audio mixing studios; 5:1 audio setup with capability to do ADR and running a dual setup of both Nuendo and Protools
5 x Audio editing studios; 5:1 audio setup and running a dual setup of both Nuendo and Protools
The facility in Frihamnen was the home of the foley, a studio of 160m2 and five audio editing suite that was currently not in use.
The plan was to use the space of the five studios to build the image postproduction infrastructure.
The requirements
Since the level of work that has been done historically at Europa Sound Postproduction has a very high standard (Guldbagge awards, Bafta awards, Oscar nomination), the requirements on the picture side was set to match that. The type of projects the company aimed for was features and high-end drama. The goal was also to attract international productions.
The facility had to be able to handle the workflow of DIT/Data Wrangler on set, incoming material, grading on projector or monitor, through online and all the way to deliveries.
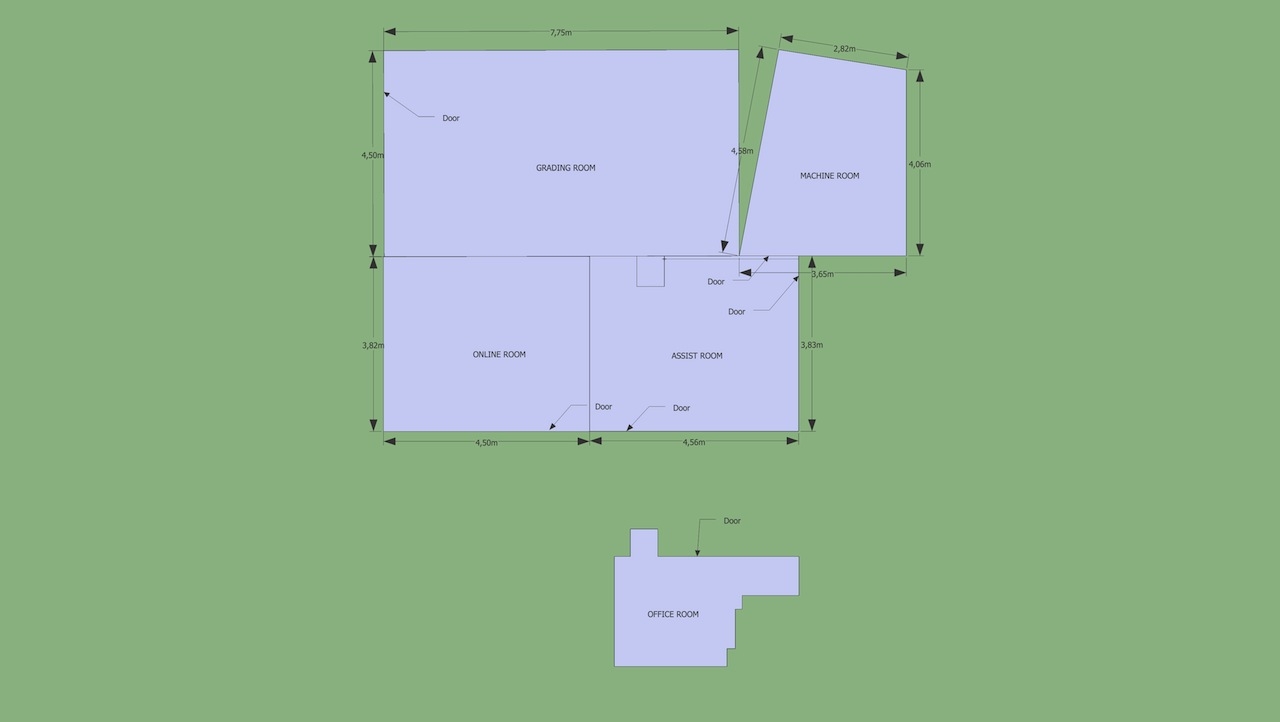
The studios that could fit in frihamnen and meet the requirements was a machine room, an assist studio, a grading studio and an VFX/online studio.
There would also be a room used as office space.
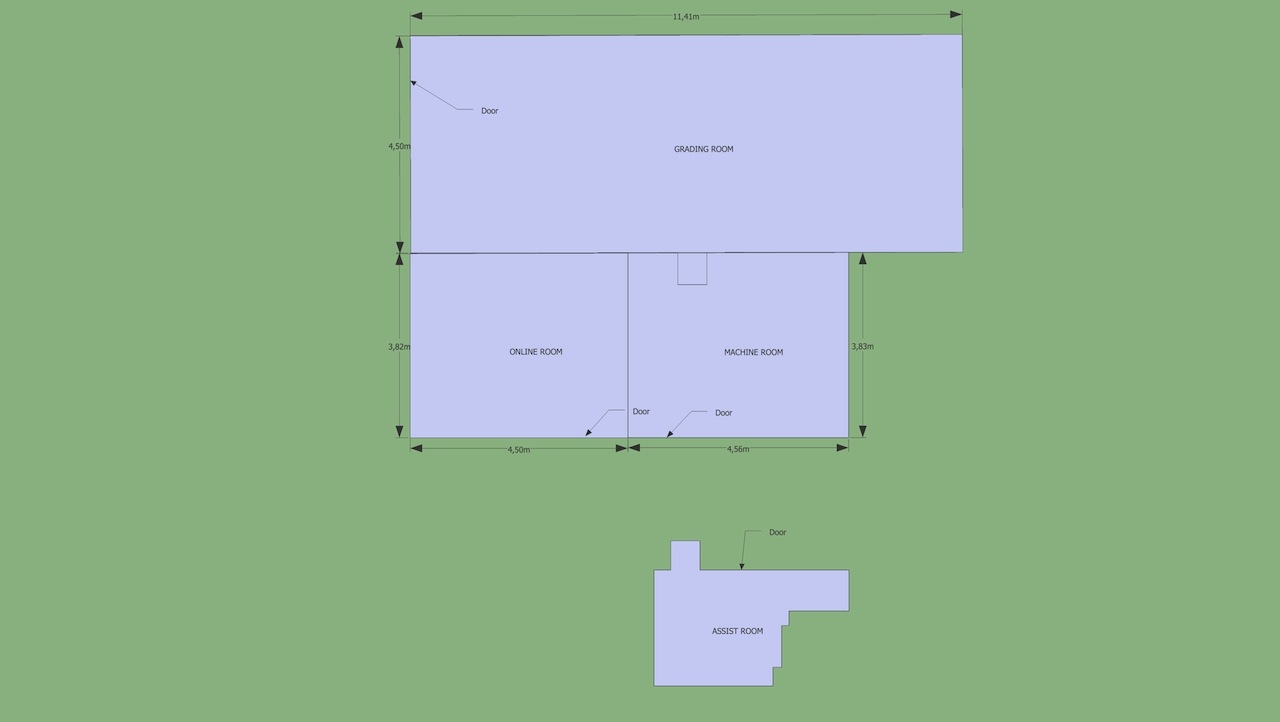
When I started to measure the rooms and doing calculations on screen size versus room proportions, we realized that the room planned as grading would not be optimal in size. The new plan was formed and the sizes and functions of the rooms were changed.
The office room was transformed into the assist room, the former assist room would be the machine room and the wall between the grading and the previous machine room would be removed to make the grading suite get better proportions.
The goal was to find the best size of screen in combination with a lens to the projector that would work in the optimal range.
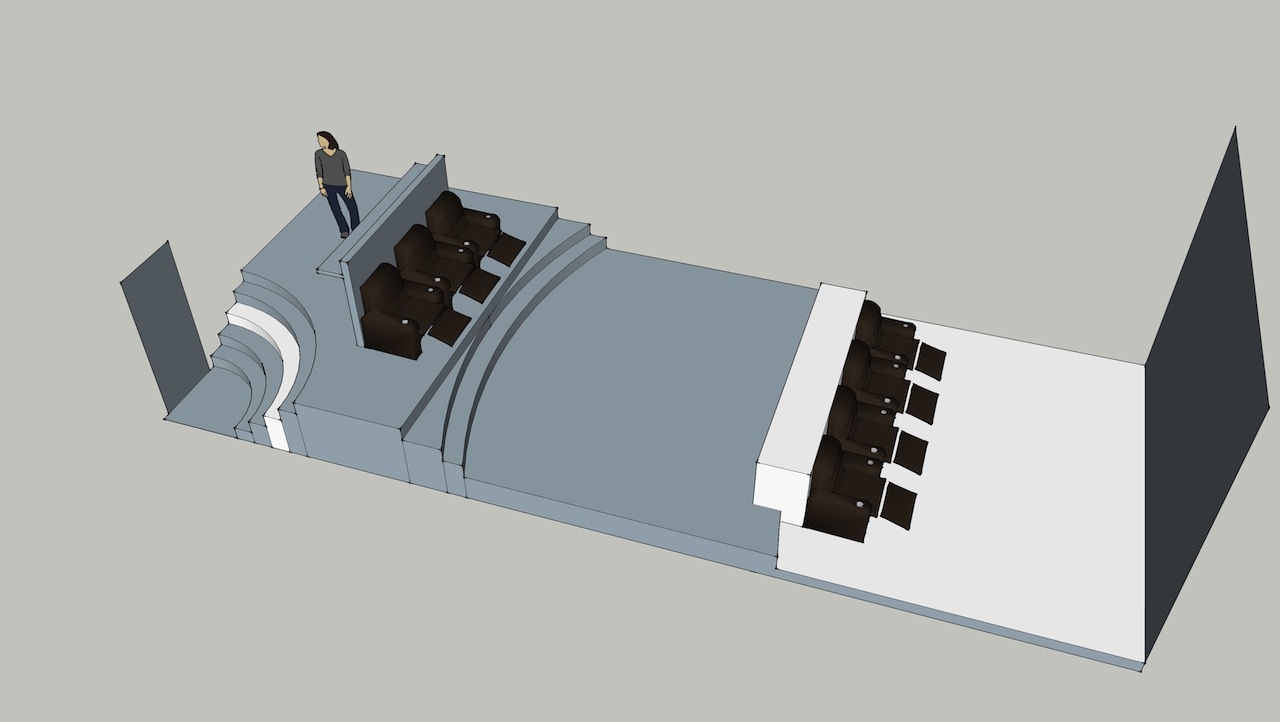
I did a rough sketch in to get the dimensions of the grading, introducing the rounded stairs and overall look.
GENERAL FEELING
The facility was small and I had the feeling from start that we would not make this a high-tech facility, design-wise. The felling I wanted to pursue was “welcome to our living room”. Creativity and security were the main targets when talking about the general feeling of the facility.
MACHINE ROOM
Since the machine room was one of the first rooms when you would enter the facility, I suggested that we put windows in the wall to the machine room and make something out of it instead of hiding the technology away in some back room. This raised the requirements on the IT guys to keep it proper and cleaned up at all time. The size of the machine room would make it possible to place five rack cabinets in it. Since we had a restriction of height of the ceiling in the room planned as machine room we had no chance of putting in a proper, raised floor as you normally would do and had to think of other ways of cooling.
ASSIST
The plan was to use this as the in/out hub of material. Since we had the fixed infrastructure of sound and image separated geographically we needed to have a solid workflow between the facilities and the assist room was planned to be the connection point as well as the place where the image department could have as the area for handling client material coming in and going out of the pipeline. Design-wise the room was planned very simple. It had to be a place for one person, a couple of computer screens, a QC monitor and 5.1 audio.
On the connection side we planned for 4x 3G-SDI, 6x CAT6 and 2x active USB connectors into the room.
ONLINE
The online room was a straight forward room to setup. It had to be a place for one person to work with a client next to him and a client area for 2-3 people more. A couple of computer screens, a QC monitor and 5.1 audio.
For consistency on the connection side we planned for 4x 3G-SDI, 6x CAT6 and 2x active USB connectors in this room too.
GRADING
Since the primary focus of the facility would be work on features and high end TV-dramas, we setup the specification for grading on screen and monitor. The room itself would be used as both a grading suite and a screening room for completed productions. The amount of people it would be specified for was 1 colorist with 1-2 clients at the desk and capacity for another 6-8 people in the room.
The feel of the room would be more towards cinema than studio. Also here, the focus should be on creativity.
For consistency on the connection side we planned for 4x 3G-SDI, 6x CAT6 and 2x active USB connectors in this room too.
HARDWARE SPECS – THE PROCESS
The unique situation with this project was that the image department had to be constructed from scratch. There was not a single piece of hardware or software to take in consideration when designing the setup of this facility.
We took the decision to not have any heat or sound producing hardware in the studios since the placement of the machine room was central and we had short cable distances all over the facility.
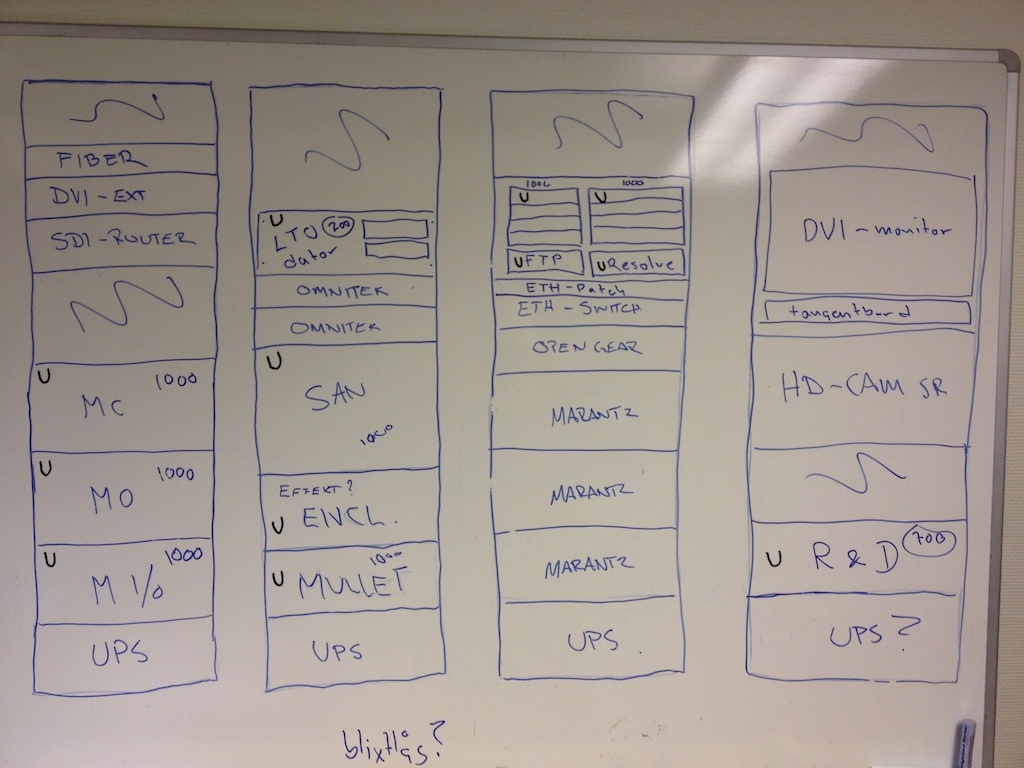
After designing and calculating the requirements for hardware space I ended up with a plan based on 5 rack cabinets. One would be populated with patch panels, switches and extenders, three for hardware dedicated to each suite and one dedicated to customer discs and other auxiliary hardware.
When planning power in the machine room, I had some requirements to meet. I wanted to have the power to each cabinet on a separate fuse and to the cabinets dedicated to the suites I wanted 2 separate fuses to each to be able to run dual power supplies to mission critical servers. When it came to the customer cabinet, I wanted it on a completely separate phase du to the fact that we would never know what kind of hardware we could expect from clients. The final setup was:
Cabinet 1 – 1x16A
Cabinet 2 – 1x16A + 1x16A
Cabinet 3 – 1x16A + 1x16A
Cabinet 4 – 1x16A + 1x16A
Cabinet 5 – 1x16A
Cabinets 2-4 would have UPS connected to one of the phases to make a possible total power failure a non issue in terms of material loss.
Since the grading suite would be one of the primary focus points we looked at the high end side of grading solutions. Both Baselight (http://www.filmlight.ltd.uk/) and Nucoda FilmMaster (http://www.digitalvision.tv/) met the level of ambition that was set up from the beginning. The systems had what was needed to build a high end grading suite, even though I had some thoughts around the fact that you were going to commit to a very specific panel and the cost invested in the system very much had to do with that piece of hardware. It felt like a straight forward choice between these systems that would in the end come down to what kind of support and infrastructure we could get from the suppliers. The fact that Digital Vision had a swedish office made the Nucoda a very interesting contender. We also needed some kind of scope solution in the suite and I started to look at different setups of OmniTek for this.
The assist room was originally planned as a generic toolbox. We had to be able to handle incoming material on all sorts of discs with all sorts of filesystems. Most data wranglers on set in Sweden are using Davinci Resolve as the main tool for material handling so we had to be prepared for that inhouse. We had to be able to generate offline material from raw material, both Avid and Final Cut. We had to be able to have the assist room as a hub inhouse to handle and generate the material going in and out of the suites. We had to be able to deliver files from small quicktime previews to DCP masters. All in all, the room had to be fitted with a lot of different software to solve all of the above and would be configured dynamically based on grading and online solution.
The online room was a tough nut to crack. There was no immediate solution to how this could be setup in an effective way. When looking at different setups the conclusion was that it was only two softwares that could be an option for us. Avid DS or Smoke for Mac. Neither of the solutions really felt modern, one quite old software and windows based and the other mac based on quite old hardware even if we were to purchase a new Mac Pro. The situation with setup in the online suite did take some time to figure out and I spent quite a lot of time trying to find some more modern work around for this. It was very annoying to have the feeling that we would have to lock ourselves into a workflow based on old technology. Some other solutions I planned on having in the suite was Nuke, some DCP creation solution, probably DVS Clipster, and also a scope. The scope here was planned to be the same OmniTek solution as in the grading.
Enter Mistika
Since I was not pleased with the solutions I looked at for the online suite, I kept looking around for some other softwares to place there. I started looking at different postproduction facilities on the international market to see if there were any new ways of thinking around workflows and infrastructure. One company I was interested in was Park Road Post in New Zealand. The scale of productions and the fact that they were using cutting edge technology with stereoscopic and High Frame rate on The Hobbit made it very interesting. With that level of commitment they must have had some new ways of approaching the infrastructure around workflows. To start with it was not that easy to find any information regarding how they had evolved the ways of working, but after some searching I found some reference to a system called Mistika. The Mistika system was interesting for us because it presented a collaborative workflow in the way I had been looking for. When I started to look at the possibilities with this a lot of pieces fell into place. The final setup of infrastructure would be based heavily on the Mistika workflow.
The final setup
To handle material during production we constructed a setup with panel mounted connectors to attach incoming client disks and from there connect it to a DAS-storage system connected to a Nearline storage server. That way we could have a very slick setup where we could dedicate separate DAS enclosures to each production during shoot. The plan with this was this setup was to minimize the cleaning time of folder structures after the delivery by detaching the enclosures and hand it to the client after post production was done. It also made it easy to have an general overview over the amount of storage each project was using. This information was to be presented on a Drupal based Intranet setup. I did some rough sketches to give an example of how we could fit things in the machine room.
We decided on a setup based on 3 Mistika systems with 4K render option, all connected by fibre to a 93TB SAN. The base setup of all three suites would be identical and to this make some additions to the suites depending on what specific functionality we would need. We would also have a dedicated R&D machine with Linux/Windows dual boot. On the Linux side we would run Mistika Alpha versions to do stability tests before deploying them on the production machines and on the Windows side we would have a Resolve setup since a lot of Swedish production are using that software on set and in other parts of the workflow. Also we planned a machine to work as FTP server and HTTP server for monitoring all hardware. I wanted an Intranet solution where we could monitor storage usage, logs and information on what software versions the different machines were running. Also since we had the API to the video router and a TCP/IP possibility to the HDMI matris, the Marantz amplifiers, the Barco and the Dolby, we planned a setup where we could do signal switching/routing and controlling the hardware through a Drupal web-gui.
The assist room would have a basic Mistika setup running on a HP Z820, connected to two screens. A third screen would be connected to the R&D machine and also to connect remotely to the MacMinis in the machine room for access to mac formatted disks. There would also be a reference monitor and 5.1 audio in the room.
The online room would have a basic Mistika setup running on a HP Z820 connected to two screens. It would also have the DCP output option installed. A third screen would be used to run a scope solution or to have Nuke access. A Panasonic BT300 Pro-plasma would be used as reference monitor and 5.1 audio.
The grading suite would have a basic Mistika setup running on a HP Z820 connected to two screens. It would have the color correction option installed. A third screen would be used to run a scope solution. As for viewing we had decided to have both projector and monitor in the suite. The projector I decided to go for was the same model of projector that the Swedish cinema distributor has installed in most of its cinemas: Barco DP2K (Barco DP2K12C). This choice was made to be able to have a reference screening without ending up in the discussion how the material can look on different brands of projectors. The projector would be connected with the choice of 3G-SDI or DualLink HD-SDI for image signal and DVI for the BluRay player and computer playback. For monitor I decided to go for the Dolby PRM-4200 Video monitor (Dolby PRM-4200), as it has become a reference standard in Sweden when it comes to working with High end TV-drama. Also as it could accurately display DCI-P3, it would be a good point of reference when working with the projector. Ian Lowe at Dolby is by the way a really nice guy.
With the Mistika infrastructure in place we could create a renderless workflow between suites and create a very strong redundancy as the hardware in the suites were identical. It also meant that we could book online sessions with clients in the grading suite if there were some requests to look at the result on a large screen and projector.
During this process I also had the time to look into alternative to the OmniTek since I did not like the idea of being so dependent of expensive hardware based solutions that would become old fast. The solution we decided to go for became Scopebox (http://www.divergentmedia.com/scopebox). We had one MacMini connected to each studio for auxiliary software like Skype, web browsing and music and we planned on using that machine to use as scope solution through SDI to Thunderbolt converter, and connect it to the third screen.
The audio setup would be 5.1 JBL speaker setup, same brand as in all the audio suites, connected to Marantz amplifiers in the machine room. They would be connected to the network and controlled by Iphone app.
As for routing of SDI signals we planned a setup with Blackmagic Design SDI 40×40 router. We also planned a Key Digital HDMI matris 8×8 to be able to route BluRay player and other equipment.
In addition to the fibre connection setup around the SAN, we also planned a 10Gb network setup for FTP, external internet connection and ordinary inhouse network traffic. Between Filmhuset and Magasin 3 we setup a dedicated fibre connection to be able to have our offsite backup mirrored between sites.
On the following pages you can find my building notes and pictures taken during the construction.


